
User guide
Royal Road Mass Scheduler User Guide
Install the Chrome extension, set up your schedule and mass schedule chapters, step by step with screenshots and videos.
- InstallAdd the extension from the Chrome Web Store.
- Sign inEnter your email and the code we send you.
- Build your scheduleChoose the first date and the chapters for each weekday.
- ScheduleCheck the dates, then schedule every chapter in one run.
Video guide
Install from the Chrome Web Store
Use Chrome on a desktop computer. You also need to be logged in to Royal Road with an author account that can add chapters to your fiction.
- Open the official Royal Road Mass Scheduler listing in the Chrome Web Store.
- Select Add to Chrome, review Chrome's permission prompt, and choose Add extension.
- Open Chrome's Extensions menu and pin Royal Road Mass Scheduler so its icon is always one click away.
The extension is distributed only through the Chrome Web Store.
Your privacy: what stays on your computer
- Everything runs inside Chrome on your computer. The extension works right on the Royal Road page you already use, just as you would by hand.
- No login needed: there is nothing to connect, and you never give us your Royal Road login or password.
- Your chapters and project settings are saved in Chrome on this computer. When you start a run, each chapter goes straight from your browser to Royal Road. It never passes through our servers.
- No diagnostics, no crash reports, no analytics and no trackers: the extension does not collect them.
- Polar handles payments, so we never see your card.
- Export a backup from the extension if you change computers or browsers, because your chapters are not stored online.
Removing the extension or clearing its data deletes the chapters saved in Chrome. Chapters already scheduled stay scheduled on Royal Road.
Sign in and start your free trial
- Click the extension icon. In Account and access, enter your email and choose Send code. Enter the six-digit code from your inbox and choose Verify and sign in. There is no password.
- The code works for 10 minutes; the panel counts down how long it has left. If it does not arrive, check your spam folder, then choose Resend code once its countdown (about a minute) ends.
- Check the email shown in Account and access. Use the same email on this website so the extension and the website show the same plan.
- Choose Start trial or subscription. The website account page opens already signed in. Start the free trial there: it lets you schedule up to 20 chapters per run, 60 chapters in total (for example 3 runs of 20). Subscribe to schedule up to 500 chapters per run.
- Back in the extension, choose Refresh account. Account and access shows your plan and how many chapters your next run can schedule.
- Your Royal Road login is separate. The email code signs you into your scheduler account, not into Royal Road.


Scheduling needs an active free trial or subscription. Chapters already scheduled on Royal Road stay there if your subscription ends.
Create a project for your fiction
- Under Project, choose New project. Give it a Project name you will recognise. Choose Open in tab at the top to edit the settings in a full browser tab.
- Open your fiction in the Royal Road author dashboard (its dashboard, chapters or drafts page) and copy the address from the browser. The fiction's public page on Royal Road works too.
- Paste it into Fiction link under Royal Road fiction. The Fiction ID fills in automatically and a green tick shows it. Check that it matches the number in the address.
- Choose Save project settings at the bottom.
- Fiction link
- An address such as https://www.royalroad.com/author-dashboard/dashboard/179712. The scheduler reads the fiction ID from it.
- Fiction ID
- The number of your fiction on Royal Road. A project only schedules on the fiction with this ID.
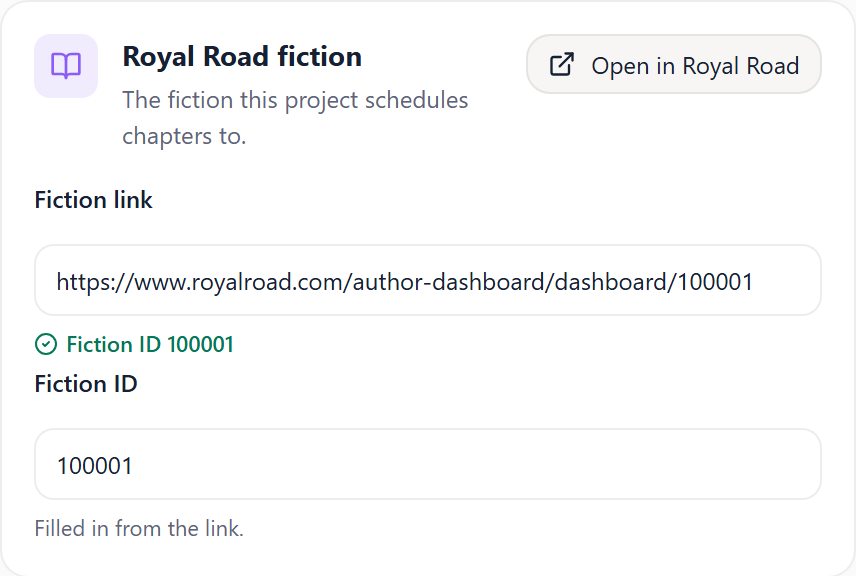
Keep one project per fiction. The scheduler refuses to run on a Royal Road page whose fiction ID does not match the project.
Set the start date and weekly release schedule
- Under Release schedule, set First release date to the first day a chapter should go live, and Start from chapter to the number of the chapter the schedule starts from.
- Set Release time: the time of day chapters go live, in your computer's time zone. First releases shows the first chapters exactly as they will be scheduled.
- Under Chapters per weekday, set how many chapters go live on each day, Mon through Sun. Every day has its own number; use 0 for days without a release. Several chapters on the same day go live a few minutes apart.
- For example, Mon 1, Tue 1, Wed 2, Thu 1, Fri 2, Sat 0, Sun 1 schedules eight chapters a week, with nothing on Saturday.
- Choose Save project settings at the bottom. The schedule preview on Royal Road updates straight away.
- First release date
- The first release day.
- Start from chapter
- The first chapter number the next run schedules. Chapters before it are left alone.
- Release time
- The release time in your local time zone. Royal Road shows the same moment in each reader's time zone.
- Mon / Tue / Wed / Thu / Fri / Sat / Sun
- Chapters released on that day of the week. 0 means no release that day.
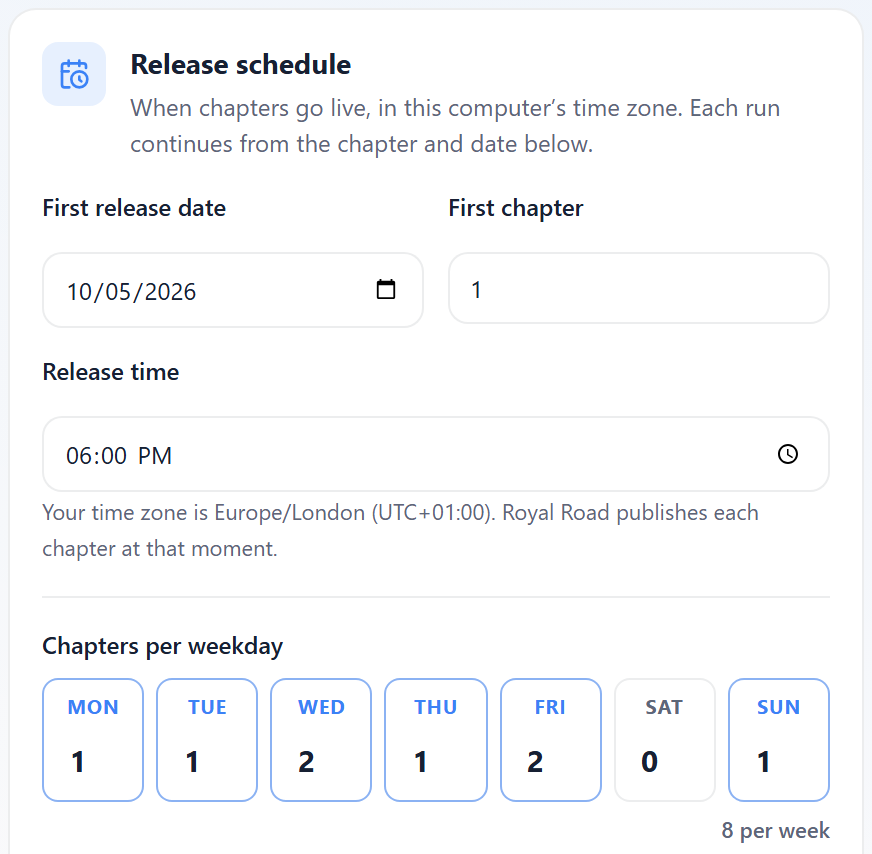
A time that does not exist on your computer's clock (for example during a daylight-saving change) is flagged in the preview and blocks the run until you choose another time.
Use burst days for a launch
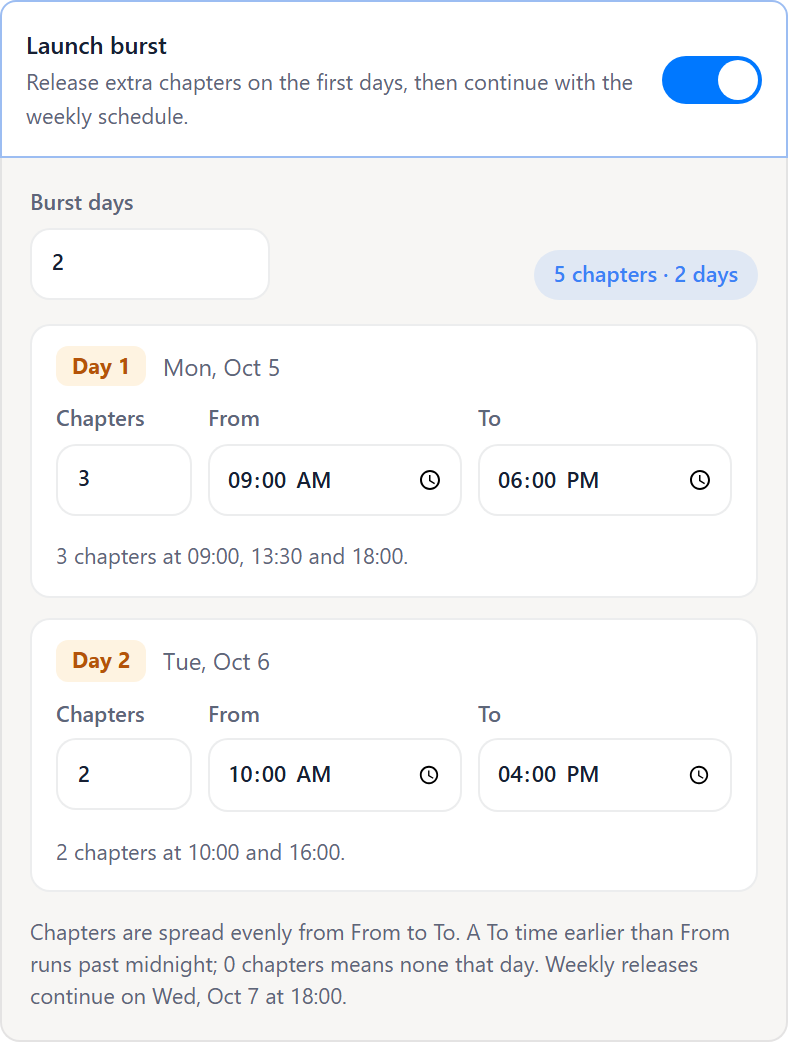
- Turn on Launch burst to release more chapters on the first days, for example to launch a fiction.
- Set Burst days. Each day gets its own card with Chapters, From and To; the chapters are spread evenly across that window, and the card shows how far apart they go out.
- A new day starts with the same settings as the day before it. A To time earlier than From runs past midnight.
- After the burst days, the weekly schedule continues; the note under the cards says on which day and at what time.
- Burst days
- How many days the burst lasts (up to 31).
- Chapters, From and To
- How many chapters go live on that burst day, and the time window they are spread across.
- Each later day
- Starts like the day before it; change its count and window as you need.
Import your chapters
- Under Chapters, choose Upload files to add .docx, .txt, .md or .html files, or Paste text to paste from Word, Google Docs or any text. Bold and italics are kept.
- Start every chapter with a line such as Chapter 12 or Chapter 12 - The Title. That line becomes the chapter title on Royal Road; the text below it is the chapter.
- To combine several chapters into one post, use a header such as Chapter 12-14.
- If the project already has saved chapters, the extension asks first, because an import replaces them all. Upload or paste every chapter you want to keep in one go.
- Check the summary after importing: the chapter range, the number of chapters and any missing numbers.
Chapter 12 - Arrival
The text of chapter twelve...

Chapter 13 - The Gate
The text of chapter thirteen...
Royal Road needs at least 500 visible characters per chapter. Chapters stay on your computer in the extension's library; they are sent only to Royal Road when you schedule them.
Add a Patreon progress notice
The notice tells readers how far ahead your Patreon is, for example "Patreon: 20 chapters ahead". It is added to the end of each scheduled chapter.
- Under Patreon notice, switch the notice on and write the Opening text and Closing text. Name your Patreon without a link: Royal Road rejects links in fanfiction chapters.
- Under How often, choose Every chapter, or Every few chapters and set the number. With every 5 chapters, the first chapter of each run gets the notice, then one every 5 chapters after it (for example 41, 46, 51). A retry keeps the same chapters, and switching the notice off removes it from every chapter.
- Under Stories on Patreon, choose Add story for each fiction to mention, with its title, the chapter Patreon was at and on which date, and how many chapters it releases on Patreon each day, Mon through Sun, so the notice can work out how far ahead each one is on the release date.
- Each story has a switch to include or leave it out. Use for all projects shares one notice, and Notice on other projects turns it on or off per project.
- Check Preview for today before you schedule.
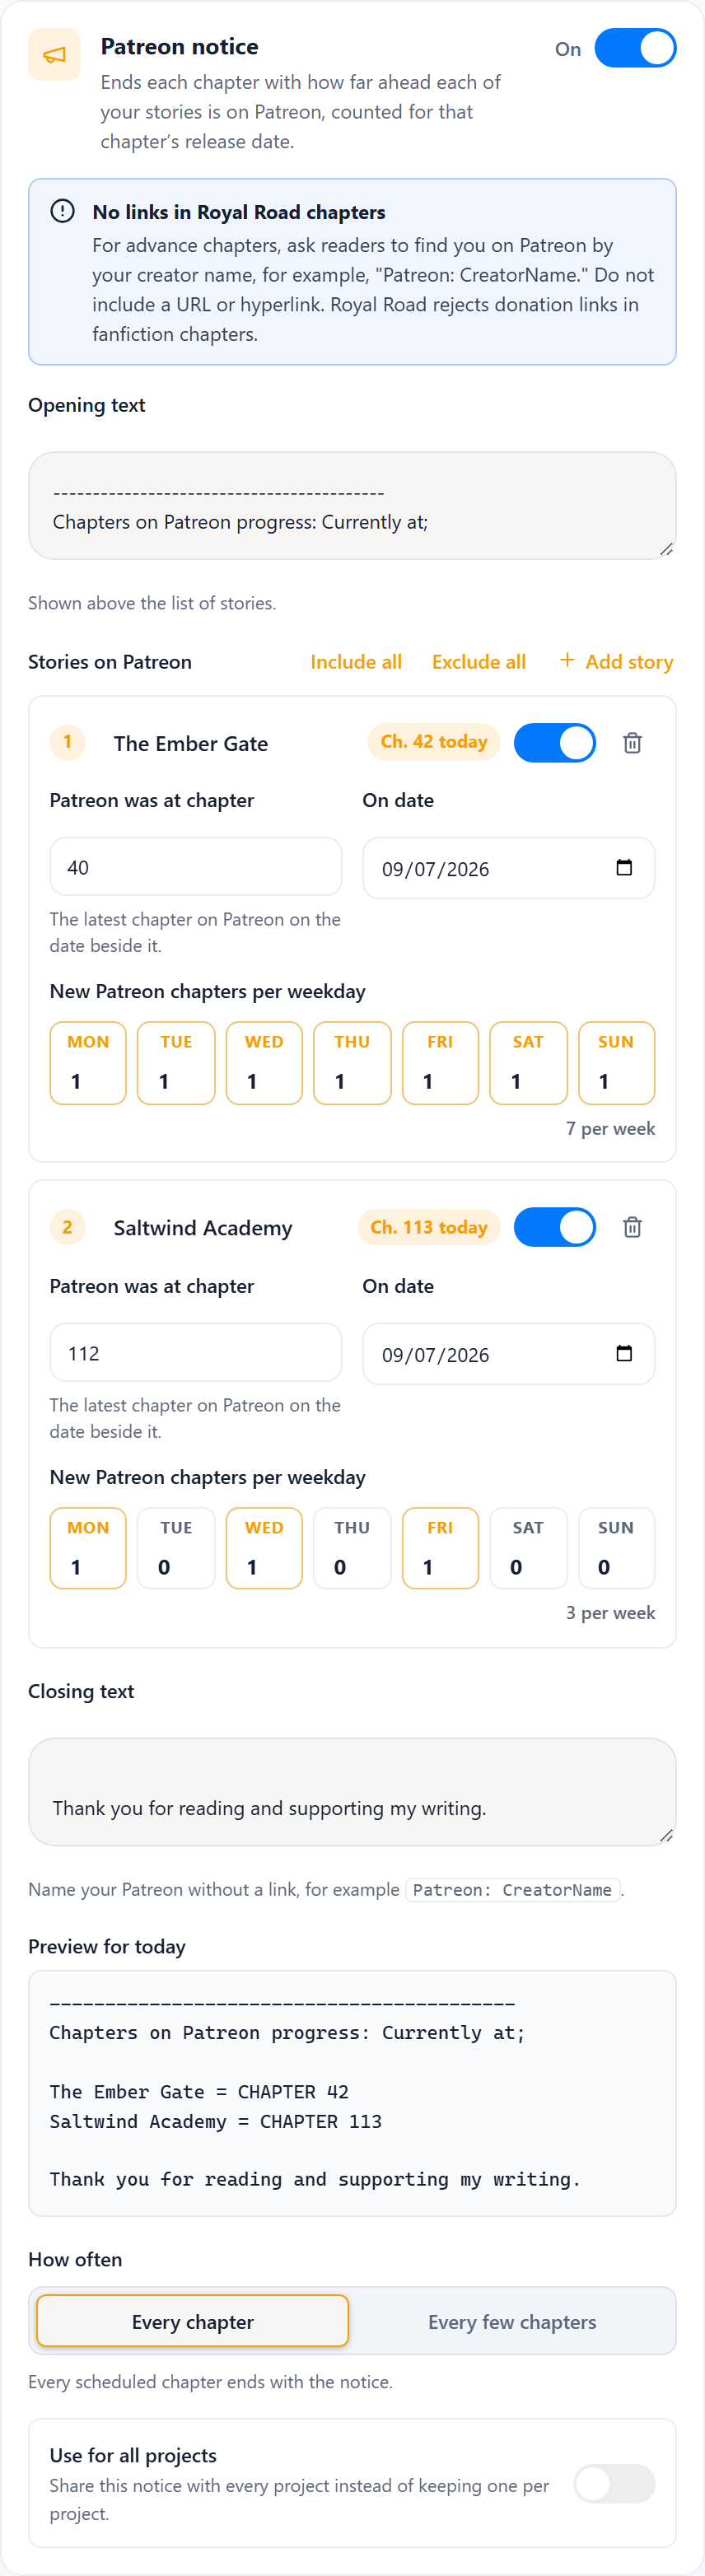
Do not put links in the notice. Royal Road rejects donation links in fanfiction chapters, so write your Patreon creator name, for example "Patreon: YourCreatorName", instead of a URL. The scheduler refuses chapters that contain a donation link.
Open the scheduler on Royal Road and check the preview
- Open your fiction in the Royal Road author dashboard: its dashboard, chapters, drafts or Add Chapter page. The Open Royal Road Mass Scheduler button appears on the page.
- Open it. The panel shows the project, the chapters ready and your plan's limit per run.
- Set Chapters to schedule. The maximum shown is the lower of your imported chapters and your plan's chapters per run.
- Check every row of Schedule preview: chapter number, date and time.
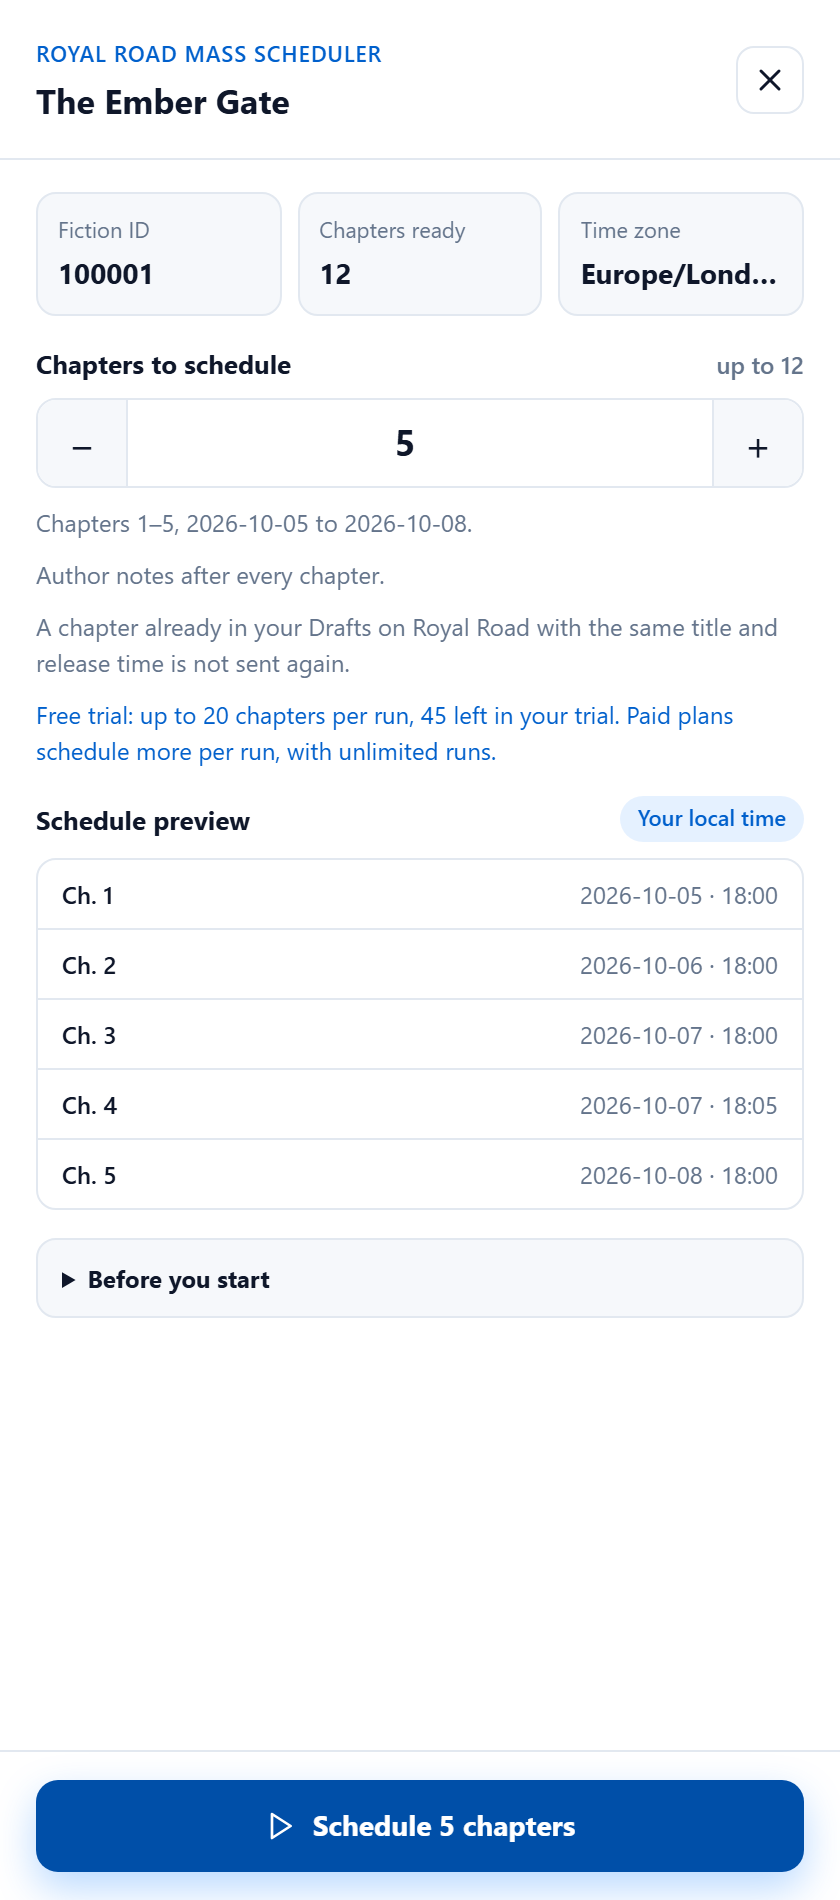
During the free trial the panel shows how many trial chapters you have left.
Start scheduling and follow progress
- Choose Schedule N chapters. A chapter that is already scheduled on Royal Road with the same title and release time is not sent again.
- Each chapter is added to Royal Road as a scheduled chapter. There is a short pause between chapters.
- You can switch to other tabs while it runs, and choose Hide to see the Royal Road page: the Scheduling button at the bottom right shows the progress, and so does the tab title. Keep the Royal Road tab open, and do not reload or leave it, until the run finishes. Stop scheduling ends the run; it does not undo chapters already scheduled.
- When the run finishes, the results list every chapter with its scheduled date and time.
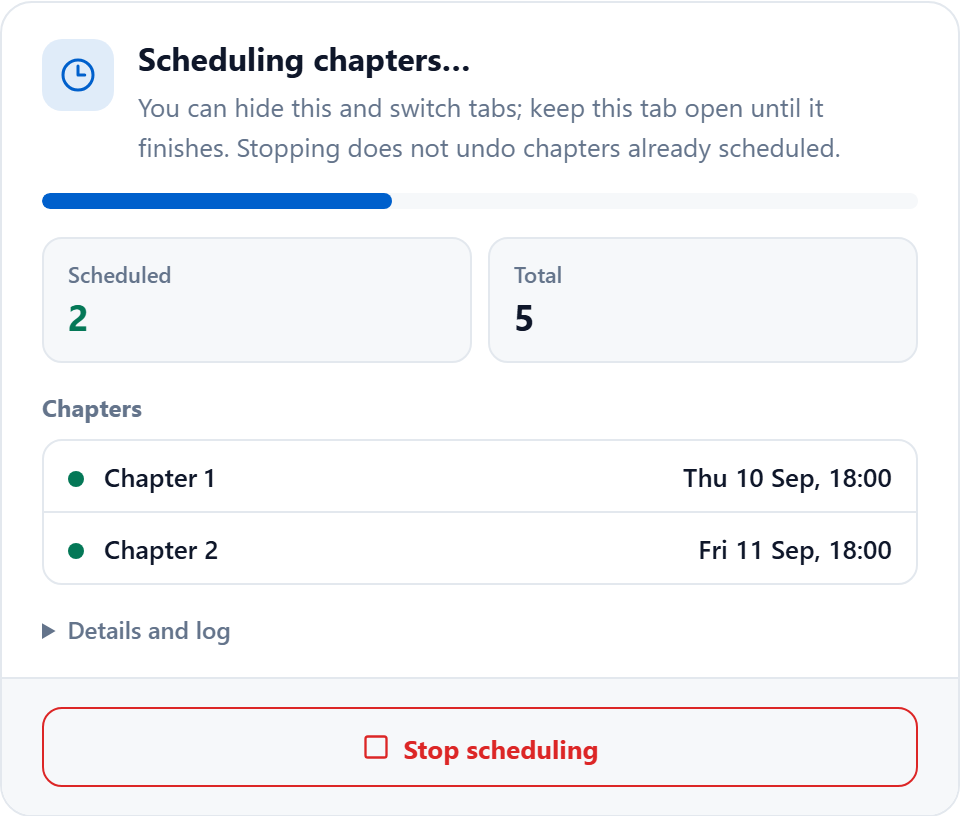
Only one run per fiction can be active at a time. A second tab on the same fiction cannot start until the first run ends.
Recover from a failed, skipped or interrupted run
- Read the reason beside each chapter in the results. A chapter missing from your library is skipped; a Royal Road error is failed.
- A chapter already on Royal Road with the same title and release time is shown as Already on Royal Road and is not sent again. A chapter you deleted from Drafts is sent again.
- Fix the cause (import the missing chapter, log in to Royal Road again), then choose Retry. It sends only the chapters that did not go through; chapters already scheduled are never sent again.
- If the page was closed during a run, open it again and start a new run with the same settings. Chapters that reached Royal Road are not sent again, so only the rest go out. If Royal Road's answer to a chapter was lost, choose Retry.
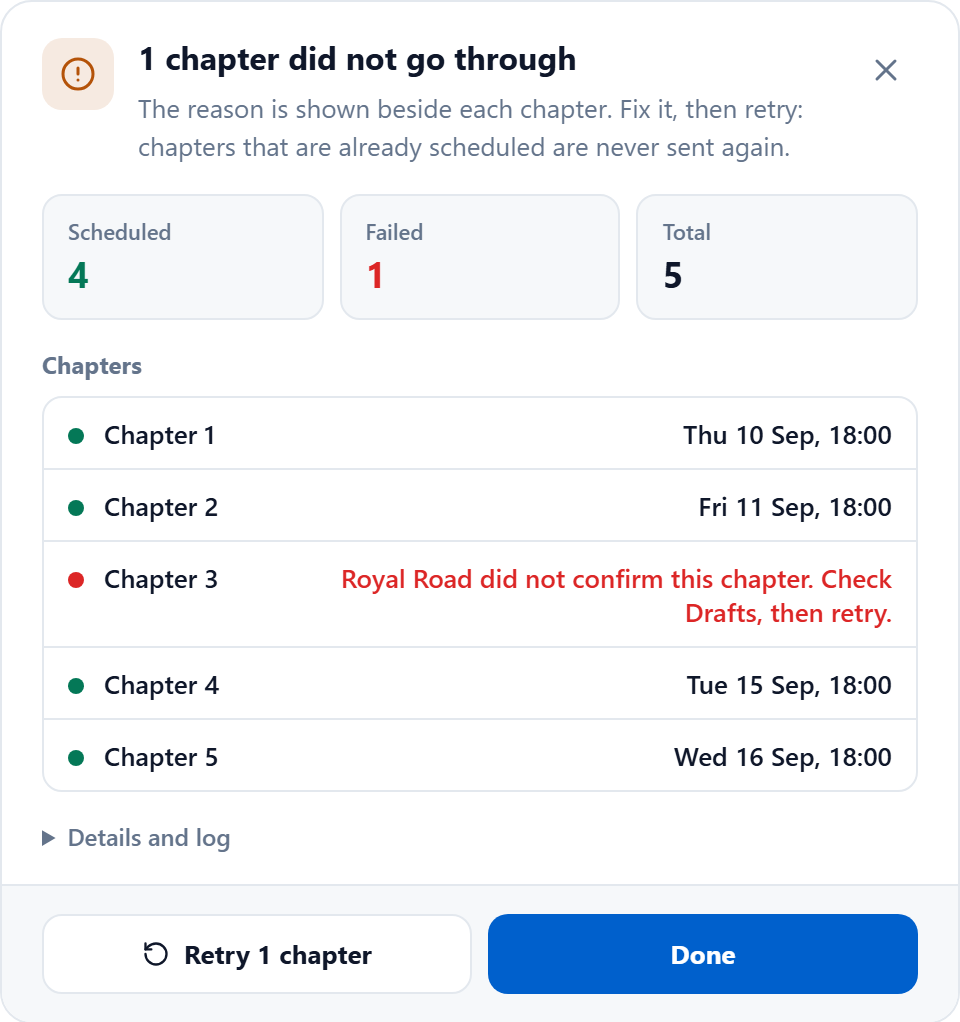
A retry does not use extra trial chapters: it is the same run. Chapters already on Royal Road are not sent and do not count.
Back up and restore your projects
- Under Backup, choose Export backup. The file holds every project, your notice settings and your imported chapters.
- To move to another computer, install the extension there and choose Import file with your backup file.
- Use Restore default settings (under Project) only when you want to start a project over; it does not change anything on Royal Road.

Troubleshooting
- "Cannot connect to your account"
- Install the extension from its Chrome Web Store listing, then sign in again. If it is already installed from there and the message stays, contact support.
- No scheduler button on Royal Road
- Turn on the extension in its settings menu, open your fiction in the Royal Road author dashboard (its dashboard, chapters or drafts page), and reload the page.
- No configured project found
- Save a project whose Fiction ID matches the fiction open on Royal Road.
- Sign in before scheduling
- Open the extension, sign in under Account and access, and choose Refresh account.
- A trial or subscription is needed
- Start the free trial or a subscription on the website, then choose Refresh account in the extension.
- Free trial chapter limit reached
- Lower the chapter count to the number shown, or subscribe to schedule up to 500 chapters per run.
- Your Royal Road session expired
- Log in to Royal Road again in the same browser, then retry the failed chapters.
- This fiction is already being scheduled in another tab
- Finish or stop the run in the other tab. A lock left by a closed tab is released automatically.
- Update the extension
- Chrome updates extensions automatically within a few hours. To get the new version sooner, close and reopen Chrome.
- Website and extension show different plans
- Check that both use the same email, then choose Refresh account.
For support, include the extension version, the affected chapter numbers and the error text. Never share one-time codes or your chapter files.
No matching steps. Try a different setting or chapter action.