Webnovel Mass Scheduler guide
Install the Chrome extension, set up your schedule and mass schedule chapters, step by step with screenshots and videos.
Install from the Chrome Web Store
Use Chrome on a desktop computer. You also need to sign in to Webnovel’s Inkstone with permission to edit the novel you want to schedule.
- Open the official Webnovel Inkstone Multi Chapter Scheduler listing in the Chrome Web Store using the link from Quirky Bit Studios.
- Select Add to Chrome, review Chrome's permission prompt, and choose Add extension. Wait for Chrome to confirm the installation.
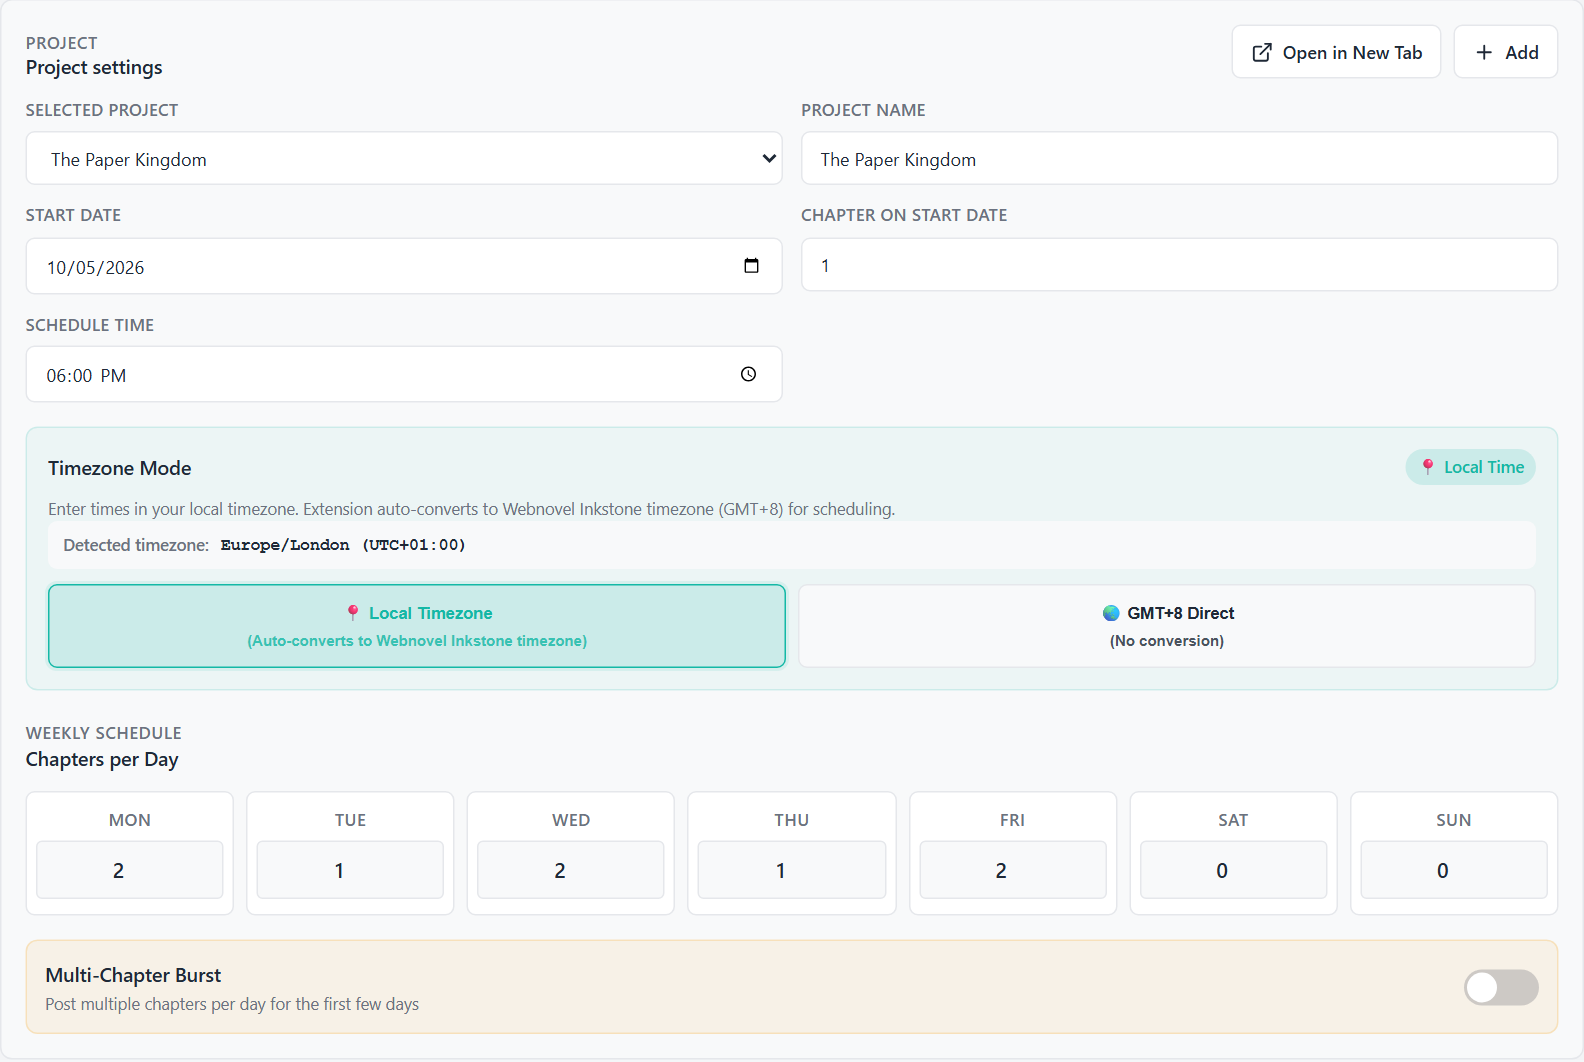
- Open Chrome's Extensions menu and pin Webnovel Inkstone Multi Chapter Scheduler. Click the extension icon, then use Open in New Tab in Project settings for more room.
The extension is distributed exclusively through the Chrome Web Store. Chrome handles extension updates. Keep an exported backup of your project settings and your original chapter files.
Enable the scheduler and choose its appearance
- Open the settings icon at the top right of the extension.
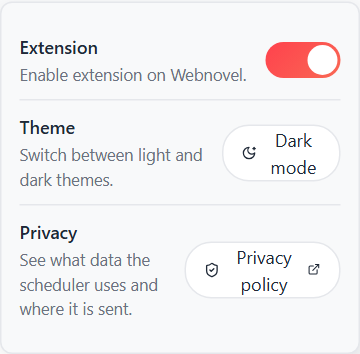
- Turn on Extension. This enables the scheduler on Inkstone pages; it does not start publishing.
- Use Dark mode or Light mode to change the extension appearance. Privacy policy opens the extension's data-use policy.
- Open your novel's chapter-list page in Inkstone and keep it open. Active tab status should show Webnovel detected and In-page ready.
Sign in to your scheduler account
- In Account and access, enter your email and request a one-time sign-in code. Enter the six-digit code to sign in or provision the scheduler account. Email code is the only scheduler sign-in.
- Confirm the email shown in the extension. Use this same scheduler account on the website when you want to see the same subscription access state.
- Open the website account page and start the free trial. It needs no card and lets you schedule up to 20 chapters per run, 60 chapters in total (for example 3 runs of 20). After the trial, subscribe to schedule up to 500 chapters per run.
- Your Inkstone session is separate: log into Inkstone in the browser as well. The email code signs you into the scheduler account, not into Inkstone.
- For more space, open the Account page in a new tab. The website uses the same email-code flow and signs you into the same account.
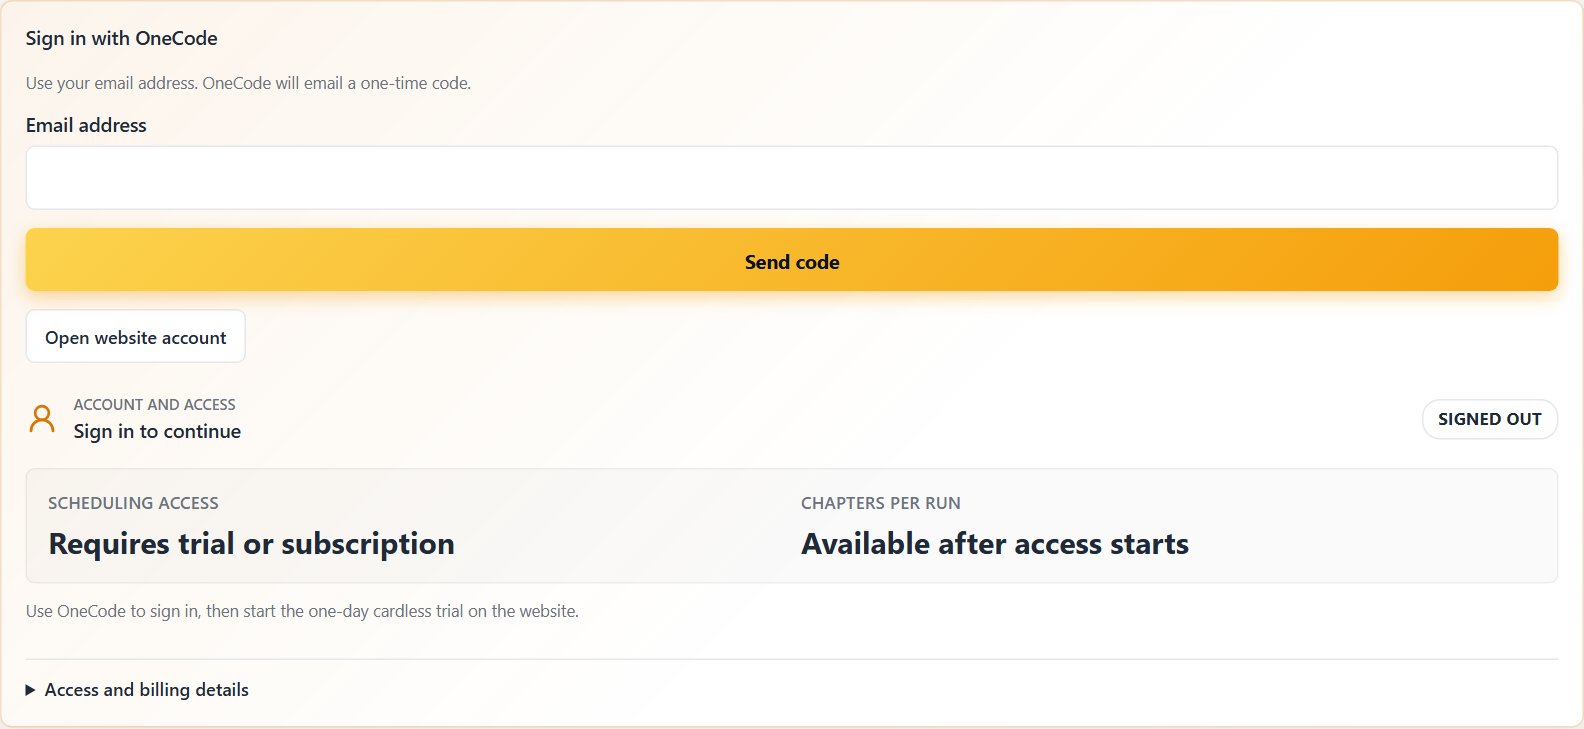
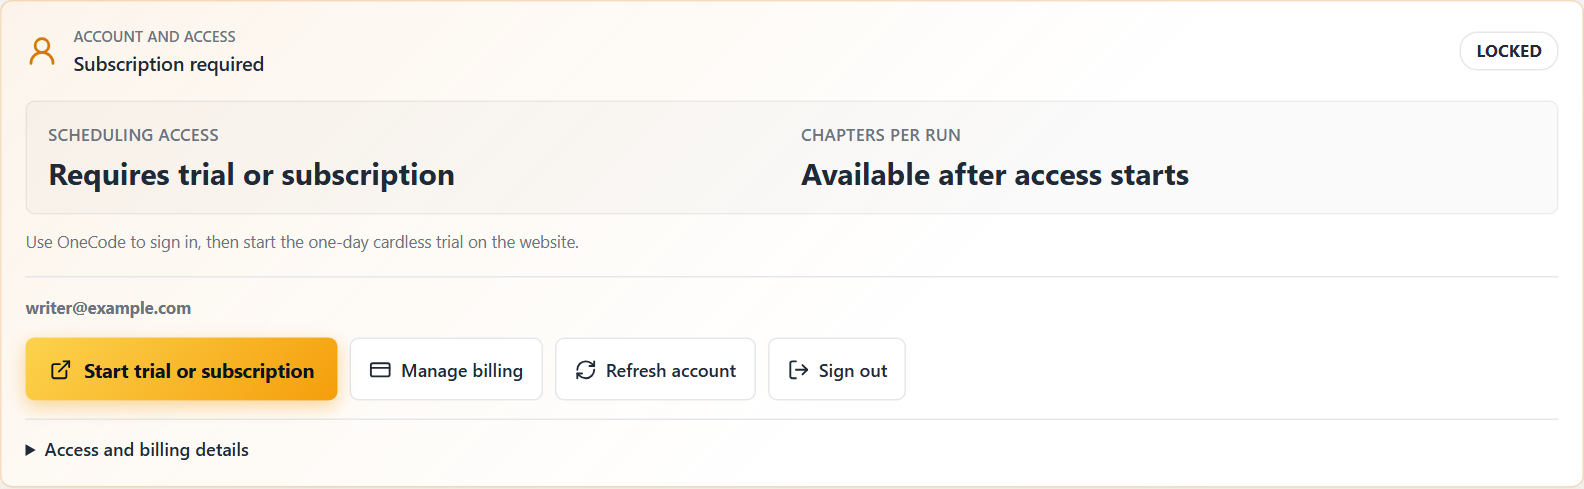
Scheduling needs an active free trial or subscription. During the trial, Account and access shows how many trial chapters you have left.
Create a project for your novel
- In Project settings, click Add to create a separate project for a novel.
- Enter a recognizable Project name. Use Selected project to switch between novels.
- Configure that project's novel target, schedule and chapter library using the steps below.
- Click Save project settings at the bottom after editing. Switch projects only after saving changes you want to keep.
Screenshots use a fictional novel and example IDs. Enter your own novel link and chapter text.
Connect the correct Inkstone novel
- Open your own novel's chapter list in Inkstone and copy its URL.
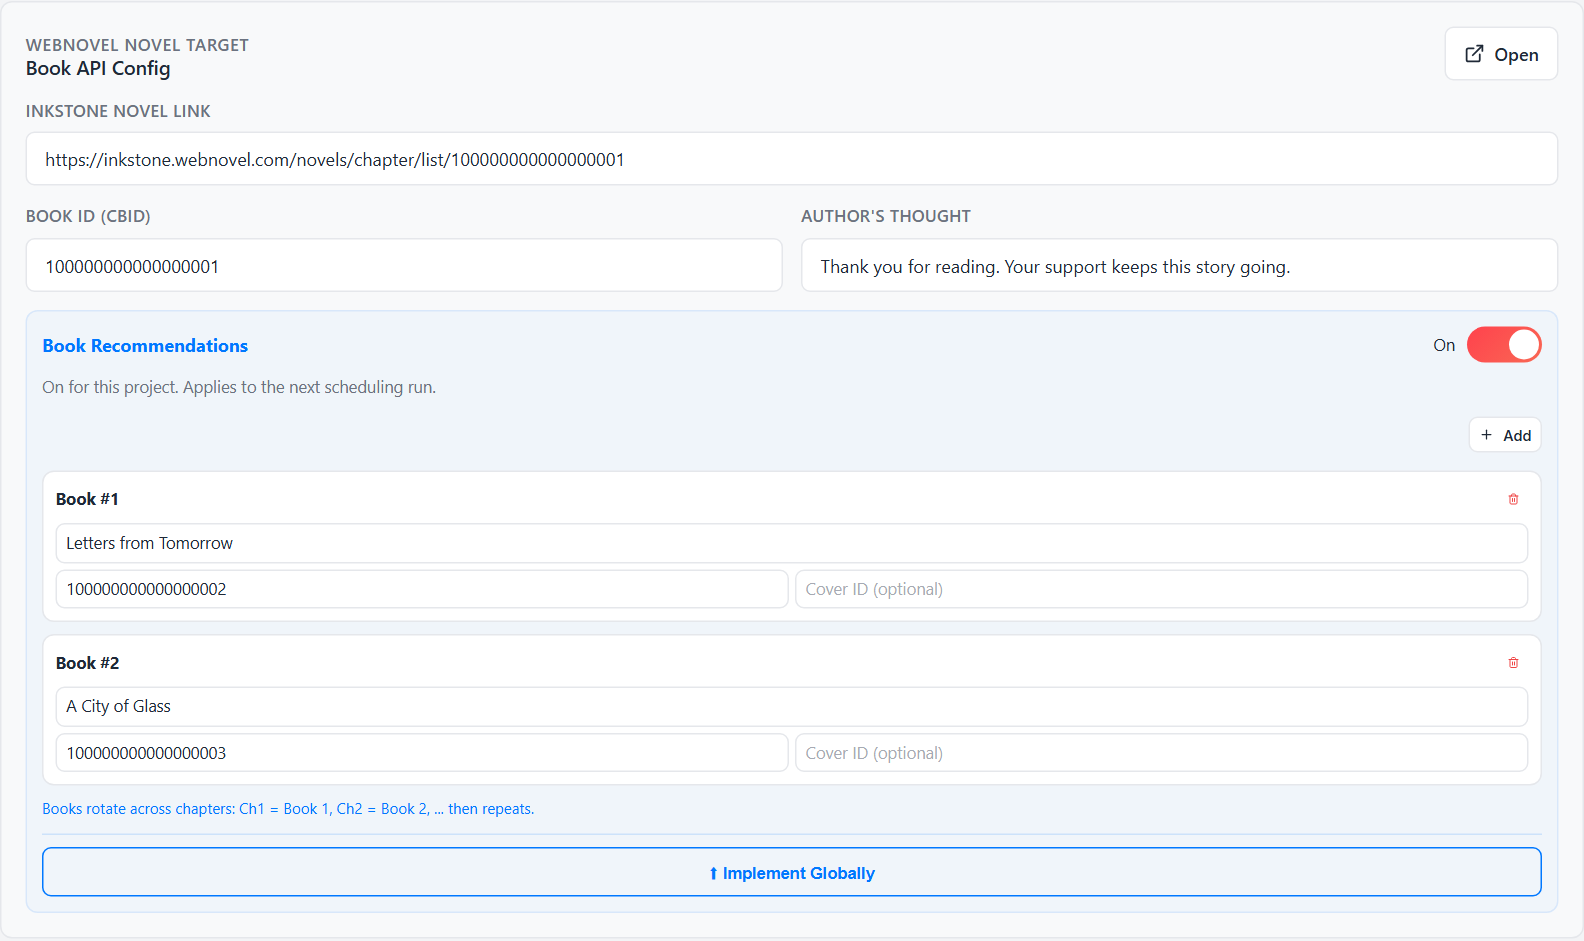
- Paste it into Inkstone Novel Link in Book API Config. A typical URL is https://inkstone.webnovel.com/novels/chapter/list/YOUR_BOOK_ID.
- Save the project and confirm Book ID (CBID) matches the novel. The extension can extract this ID from the link.
- Use Open beside Book API Config to return to that novel. Check the active project and book ID before scheduling.
- Inkstone Novel Link
- The chapter-list, chapter-create or novel-view link for your novel.
- Book ID (CBID)
- The numeric novel identifier. Do not use a chapter ID or an ID from another book.
- Author's Thought
- Your author note sent with chapters. Replace the default note or leave it empty if you do not want one.
Set the start date and weekly release schedule
- Set Start date to the first publishing date. Use a future date for a new schedule.
- Set Chapter on start date to the first imported chapter number to publish, not the number of chapters to send.
- Choose Schedule time in the timezone mode selected below.
- Enter a chapter count for each weekday. A value of 0 skips that day. At least one weekday needs a nonzero count when burst mode is off.
- For example, Mon 2, Tue 1, Wed 2, Thu 1, Fri 2, Sat 0, Sun 0 schedules eight chapters across a working week.


Normal multiple-chapter days use five-minute intervals from Schedule time. Check the preview for the exact chapter/date/time pairs, especially when scheduling near midnight.
Choose Local Time or GMT+8 Direct
- Use Local Timezone when you want to type times in the timezone of this computer. Confirm the Detected timezone shown in the panel.
- Use GMT+8 Direct when you want to enter Webnovel's server time directly, without conversion.
- Recheck dates and times after switching modes. The same entered 18:00 represents different moments in the two modes.
- In the screenshots, Europe/London is UTC+1 during British Summer Time. A local 18:00 corresponds to 01:00 the next day in GMT+8. Other timezones, and daylight-saving transitions, may change the difference.


The schedule preview uses the selected mode. Confirmed chapter results show GMT+8, the time sent to Inkstone.
Use Multi-Chapter Burst for an opening release
- Turn on Multi-Chapter Burst when the beginning of the schedule needs more frequent releases.
- Set Burst days from start and Chapters per day (burst). For example, 2 days and 3 chapters produces six opening chapters.
- Set Burst start time and Burst end time. Chapters are spaced across that window. For a same-day burst, make the end later than the start. An earlier end crosses midnight; matching times span 24 hours.
- After the burst days, the normal weekday schedule resumes at Schedule time. Review the burst rows in Schedule Preview before starting.
- Burst days from start
- How many opening days use burst rules.
- Chapters per day (burst)
- At least two chapters per burst day.
- Burst start / end time
- The opening release window, in the selected timezone. Overnight windows carry into the following date; always inspect the preview.
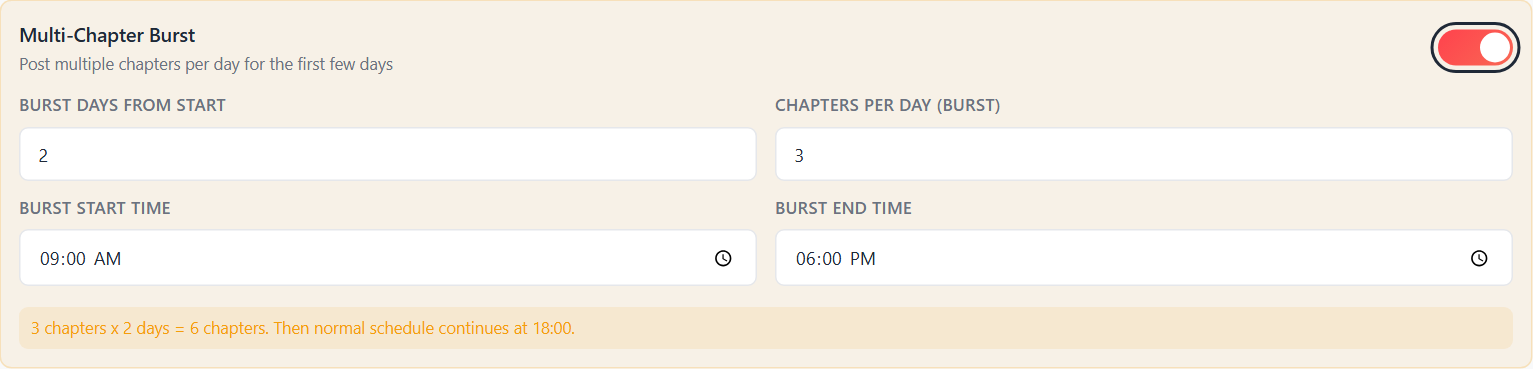
Burst changes scheduling times, not the chapter count. A run can schedule up to 500 chapters with a subscription, or up to 20 during the free trial; inspect the preview before starting.
Import chapters by pasting text
- Scroll to Chapters and click Paste.
- Paste complete chapters with explicit, numbered headers such as Chapter 1: The Last Letter and Chapter 2: An Unmarked Road.
- Check the detected chapter count, range and missing-number notice in the dialog.
- Click Import pasted chapters. Wait for the dialog to close, then confirm the updated saved chapter count.
Chapter 1: The Last Letter

Your first chapter text goes here.

Chapter 2: An Unmarked Road

Your second chapter text goes here.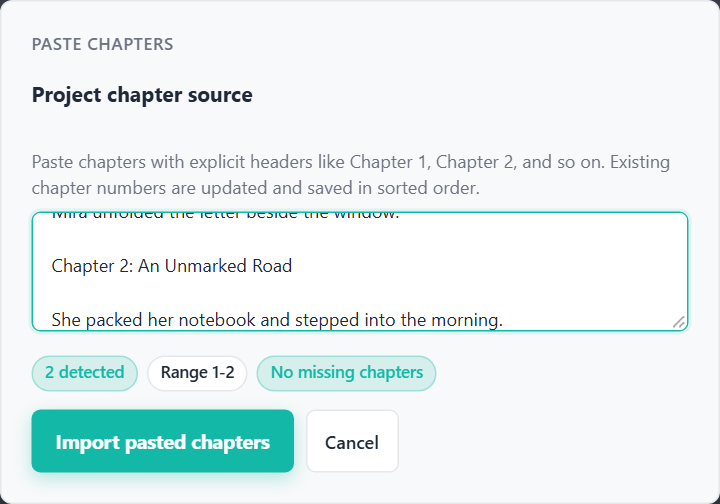
A numbered header must start on its own line, with a blank line before the next chapter. Importing a chapter number already in the library updates its saved text. Duplicate numbers within one import are rejected; correct them before importing.
Upload files and check the saved chapter library
- In Chapters, click Upload and select one or more .txt or .md files.
- Use a clear numbered chapter header inside each file, and keep filenames organized by chapter number. Explicit headers are the most reliable source of chapter numbers.
- Review the saved chapter count, number range, Imported time and Missing field.
- Expand Saved chapter list to check which chapter numbers are present. Re-import a missing chapter before starting or retrying that chapter.
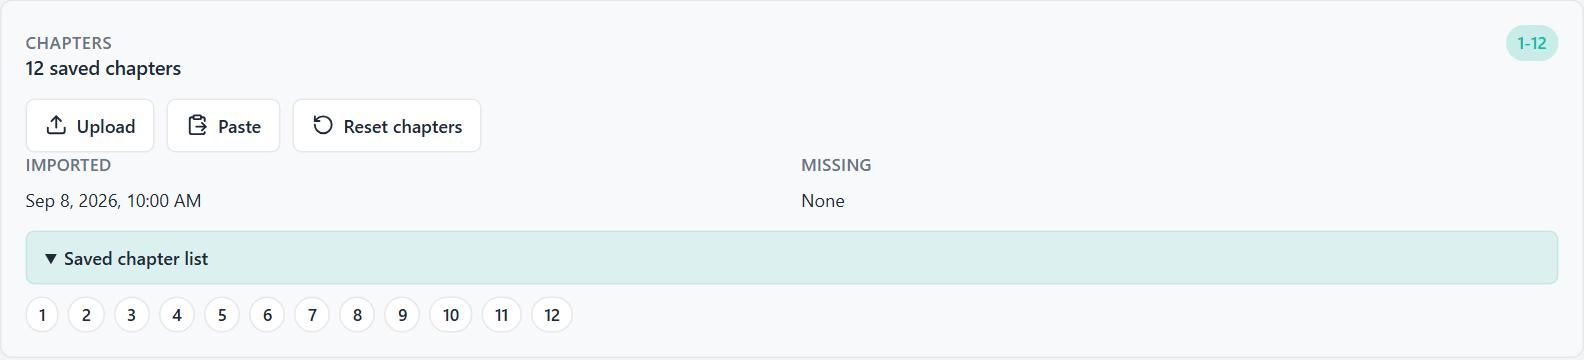
Reset chapters clears the selected project's imported library. It does not remove chapters already sent to Inkstone. Original chapter files are your content backup.
Add book recommendations and author notes
- Set Author's Thought in Book API Config for the author note you want sent with chapters.
- Turn Book Recommendations on if you want recommendations included for this project. Turning it off keeps the saved books but stops sending them.
- Use Add in the recommendations area. Enter each Book Title and Book ID; Cover ID is optional.
- With multiple recommendation books, the extension rotates them across chapters and skips the current novel.
- Save the project after changing the book list.
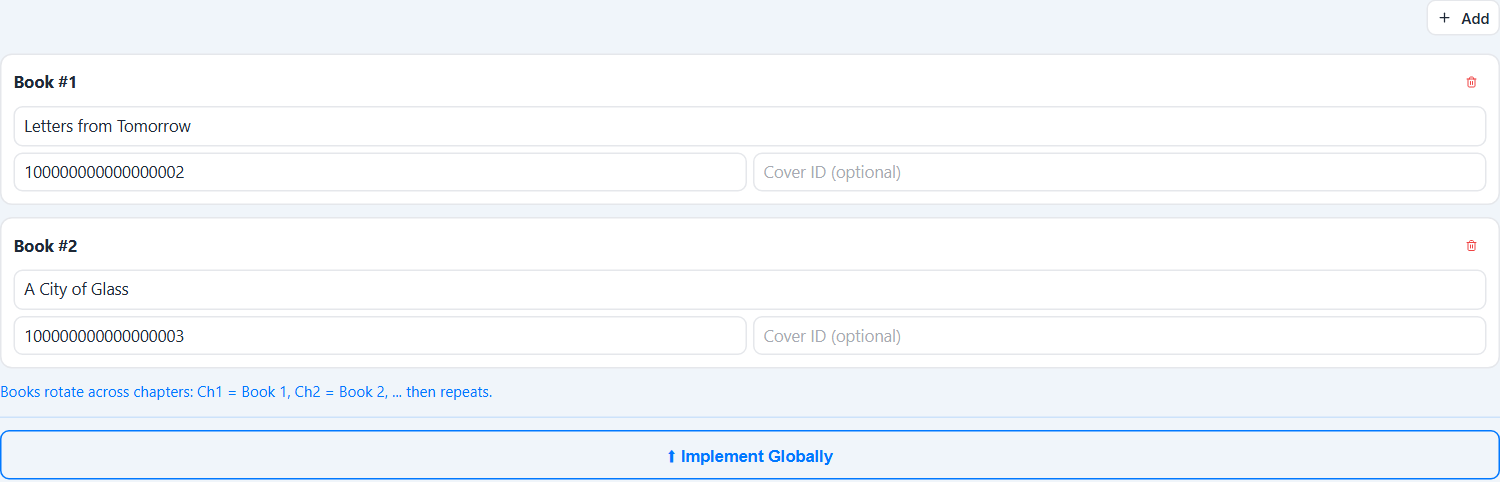
The recommendations on/off switch is saved immediately for the current project. Other project edits still need Save project settings.
Configure the Patreon progress notice
The extension automatically calculates the current chapter number on Patreon for each book from the schedule you enter in Patreon Notice. Each book has its own starting chapter, starting date and weekday release counts. It adds the calculated results to the end of your Webnovel chapters.
- Turn Patreon Notice on for the Webnovel project that should include the message. Enter your introduction in Notice Header and your Patreon link or closing text in Notice Footer.
- Click Add Fanfic once for every book you want listed. Display Name is that book's name in the final notice; it can be different from the Webnovel project you are scheduling.
- For each book, choose a Start Date and enter the latest chapter already available on Patreon on that date as Start Chapter. Use a date on or before the Webnovel releases you are scheduling. This is the calculation's starting point, so that date's releases must already be included in the number.
- Set MON through SUN to the number of new chapters that book releases on Patreon on each weekday. Use 0 for a day with no release. These are that book's Patreon counts, separate from your Webnovel publishing schedule.
- Check Notice Preview (today). For each book, it adds releases after Start Date through today to Start Chapter. For a Webnovel chapter scheduled in the future, the notice is calculated through that chapter's scheduled date instead.
- Save project settings. The extension recalculates the notice for every scheduled chapter, so several books with different Patreon schedules can appear together with different chapter numbers.
- Display Name
- The book title readers see in the notice. Add a separate row for every book, novel or fanfic.
- Start Date + Start Chapter
- A known Patreon chapter number on a known date. The start date itself is not counted twice.
- MON / TUE / WED / THU / FRI / SAT / SUN
- New Patreon chapters per weekday for this book. These values drive the automatic calculation.
- Example: The Paper Kingdom
- Chapter 50 on Monday, September 7, 2026, then 2 chapters every weekday. By Wednesday, September 9: 50 + 2 Tuesday + 2 Wednesday = chapter 54.
- Example: Lantern Road
- Chapter 120 on the same Monday, then 1 chapter on Monday, Wednesday and Friday only. By Wednesday: 120 + 0 Tuesday + 1 Wednesday = chapter 121.
On a Webnovel chapter scheduled for September 9, 2026:

Read ahead on Patreon:
The Paper Kingdom = CHAPTER 54
Lantern Road = CHAPTER 121
Your Patreon link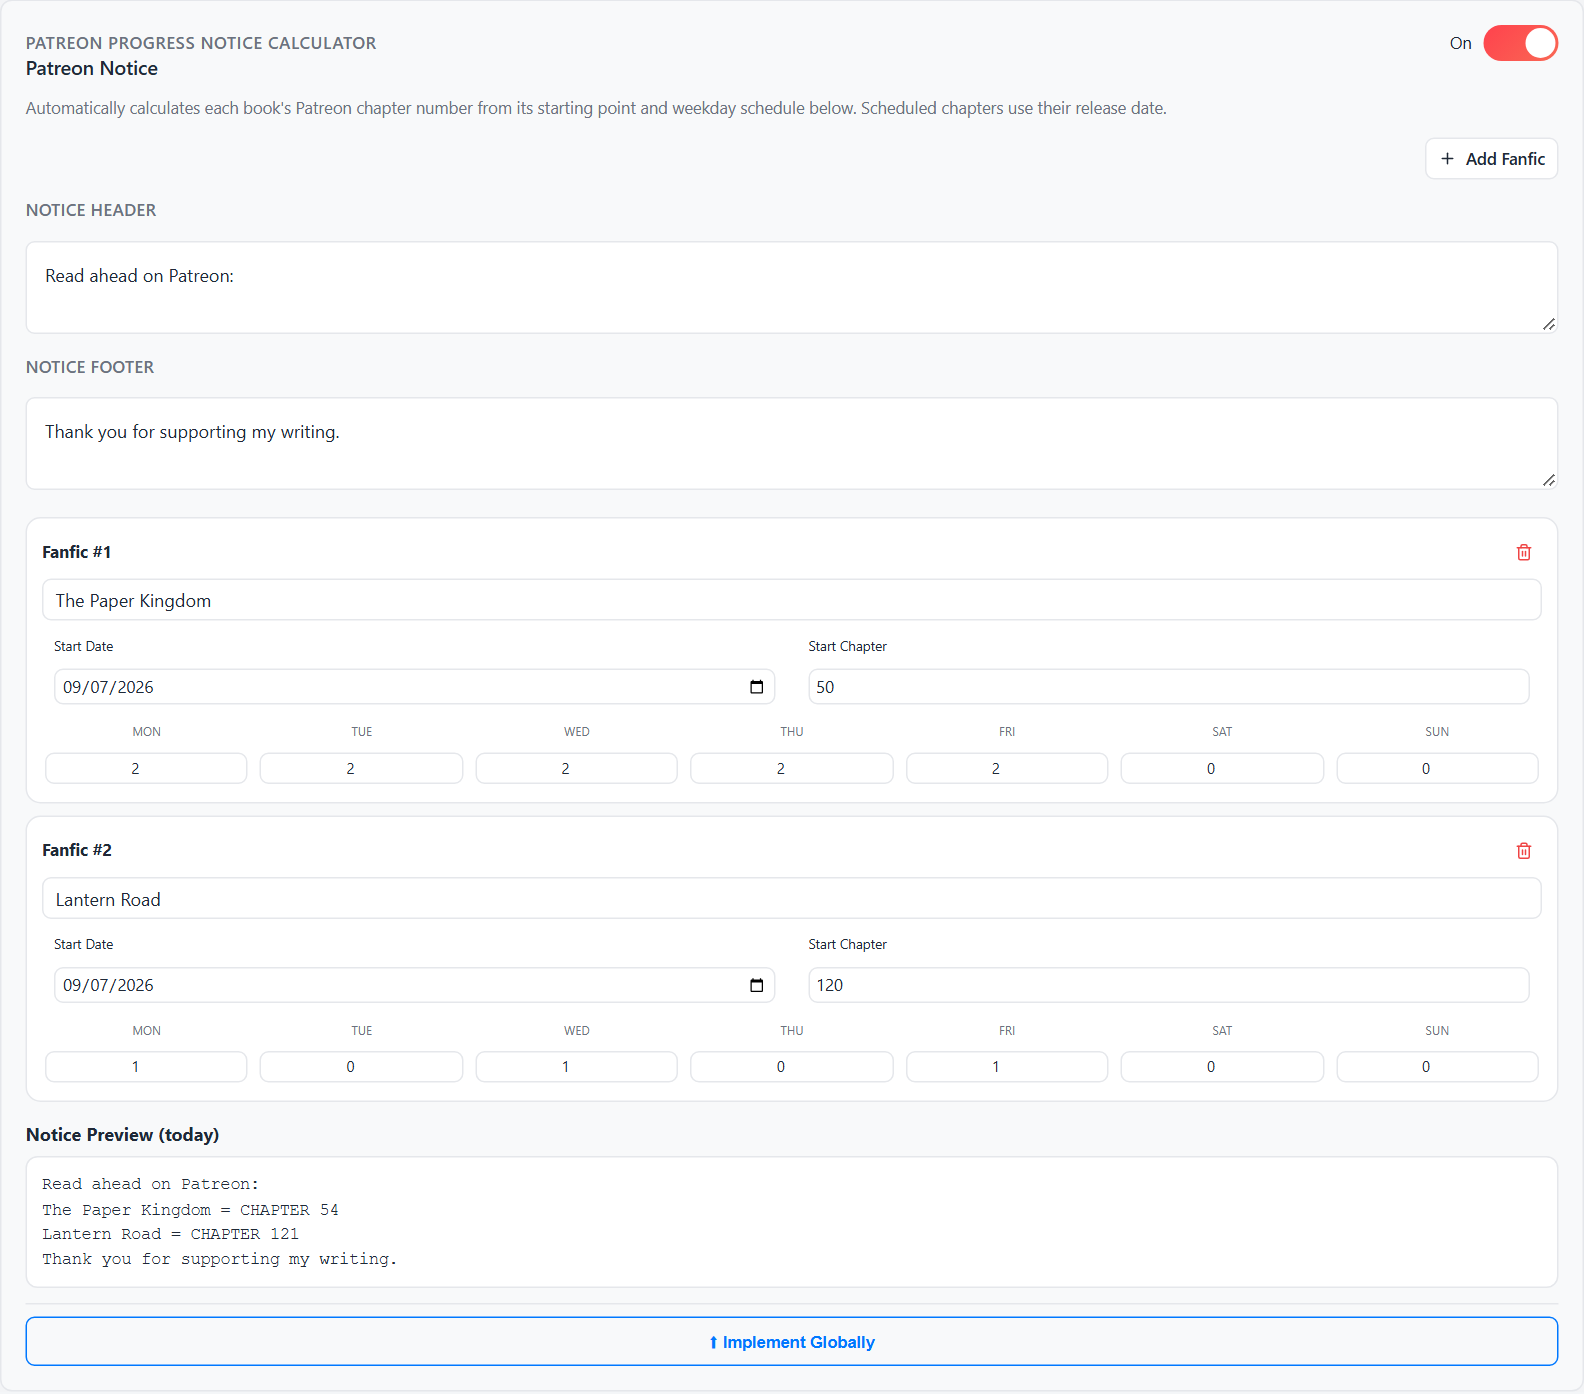
The numbers are schedule-based estimates: the extension does not read your Patreon posts or publish to Patreon. If you skip, add or delay a release, update that book's starting point or weekday counts before scheduling more Webnovel chapters. Existing chapters on Inkstone are not edited automatically. Turning the notice off keeps its saved values.
Share notices or recommendations across projects
- Configure the recommendations or notice you want to share, then click Implement Globally in that section.
- The section shows GLOBAL and a control for disabling global mode. Recommendation and notice global settings are separate.
- Edits in global mode affect other projects using those shared values. Each project's publishing on/off switch still controls whether the shared content is included.
- Click Using Global Notice (Click to Disable), or the equivalent recommendations control, to return to that project's own values.
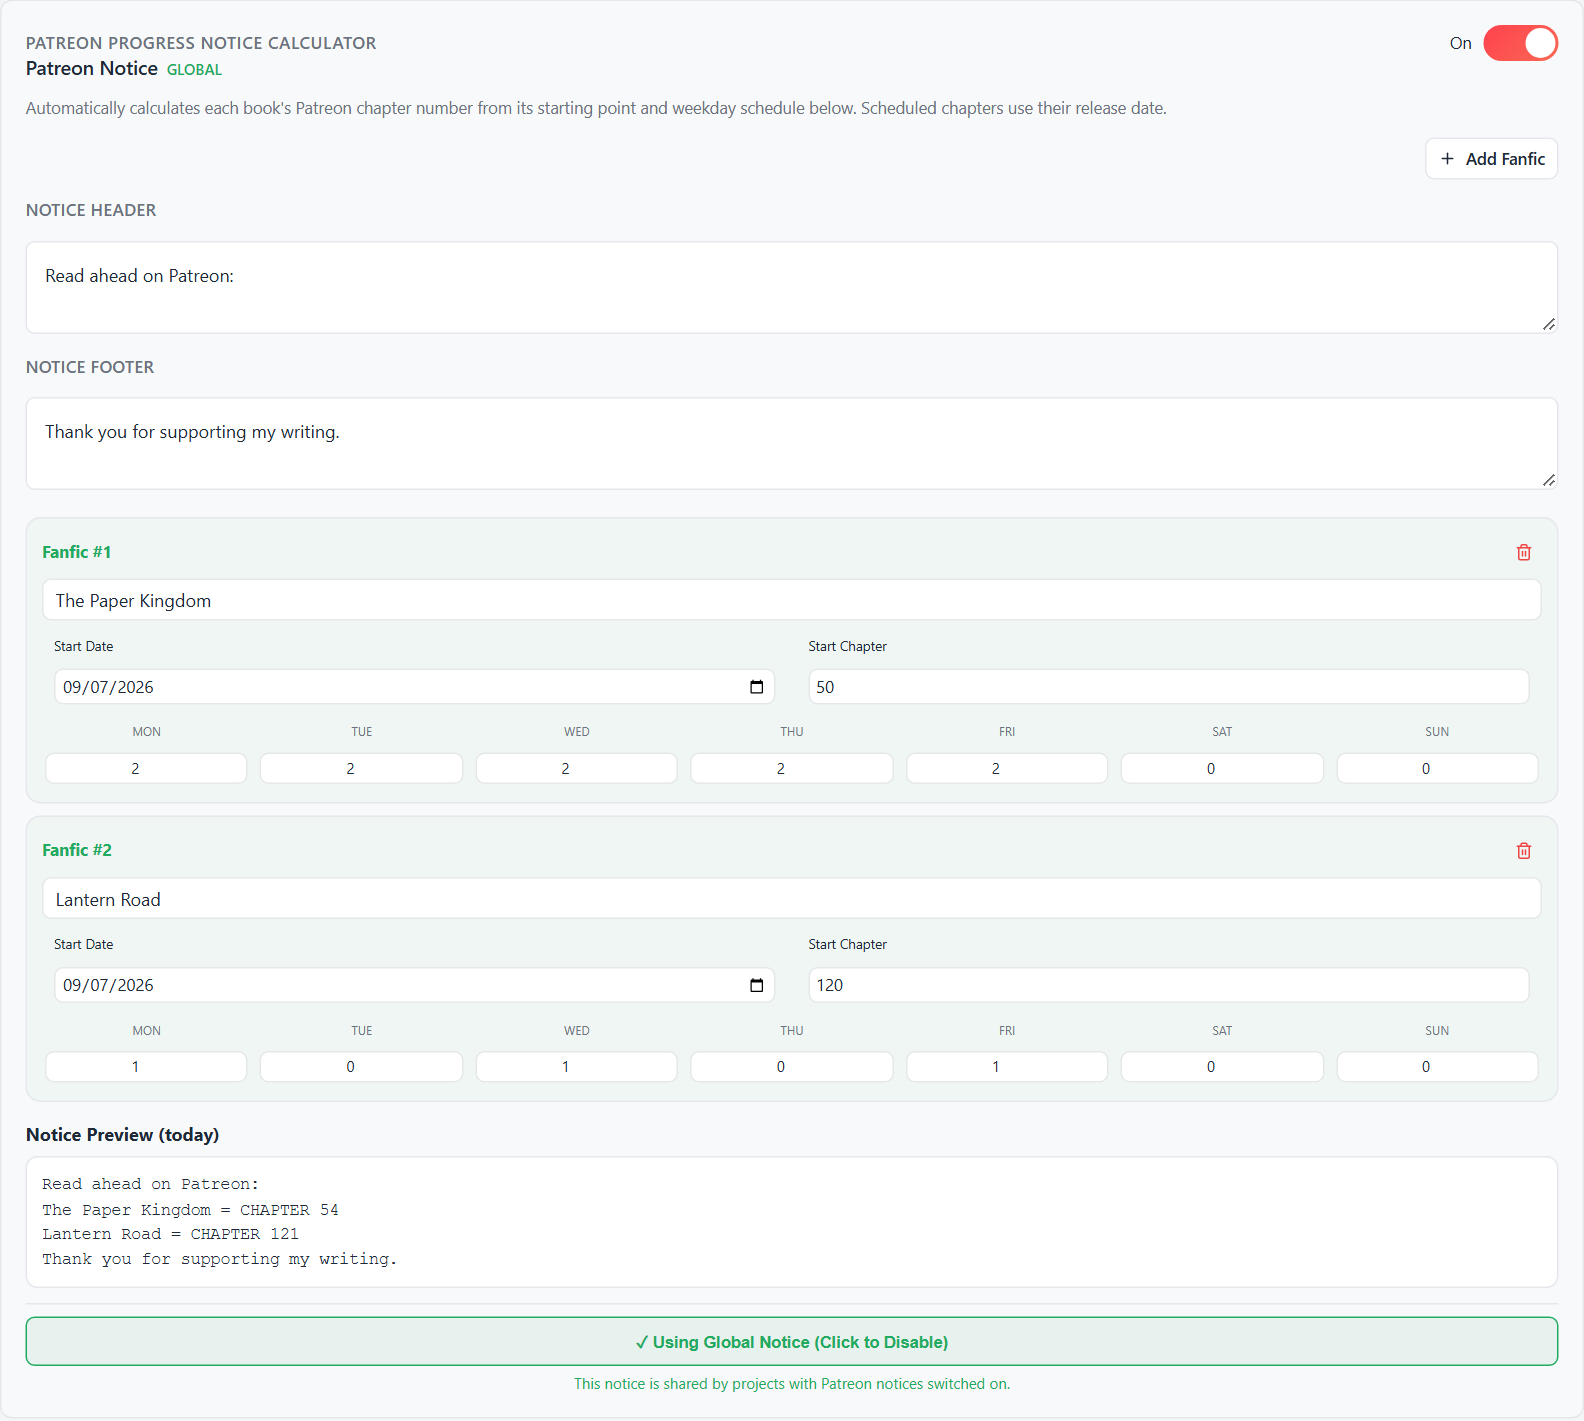
Save and check the project before publishing
- Click Save project settings at the bottom of the extension.
- Confirm the selected project name, Inkstone link and Book ID are for the intended novel.
- Check the first chapter number, start date, timezone and weekday counts. Confirm the library includes the chapters you need.
- Review optional recommendations, author note and notice text. Switch off anything you do not want included.
- Open the matching Inkstone chapter page and remain signed in there.

Reset settings restores project defaults. Delete project removes the selected project locally and is unavailable when only one project remains. Neither is an undo for chapters published to Inkstone.
Open the scheduler and inspect every scheduled slot
- On the matching Inkstone chapter-list page, click Open Webnovel Inkstone Multi Chapter Scheduler.
- Check Active Project and Book ID. If No Configured Project Found appears, return to the extension, correct the novel link and save.
- Set Number of Chapters to Schedule. The available library count is shown. A subscription schedules up to 500 chapters per run; the free trial schedules up to 20 per run and 60 in total, and the box will not go higher during the trial.
- Inspect Schedule Preview: chapter number, date, time, timezone badge and any burst labels. Start with one or two chapters for your first test.
- Click Start Scheduling only after checking the preview. This begins sending chapters; it is not a dry run.
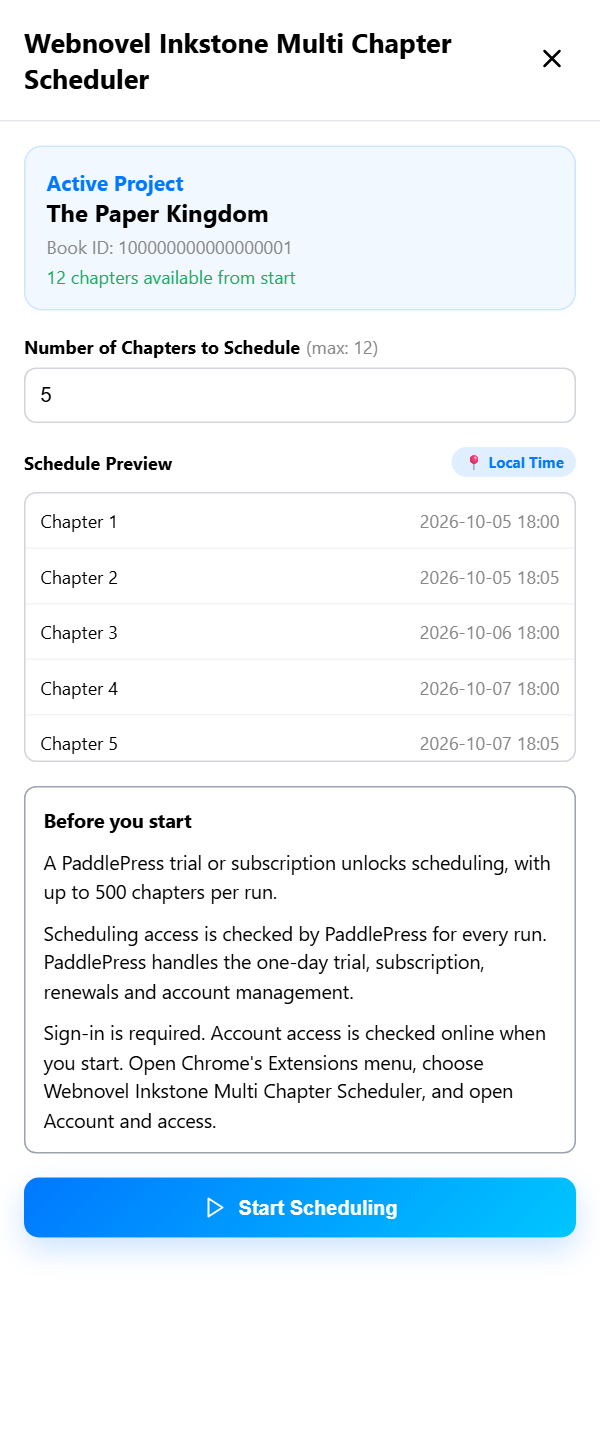
Keep this Inkstone tab and Chrome open while chapters are being scheduled. The extension sends scheduled dates to Inkstone; it does not need to remain open until those future release dates.
Monitor progress and stop an active run
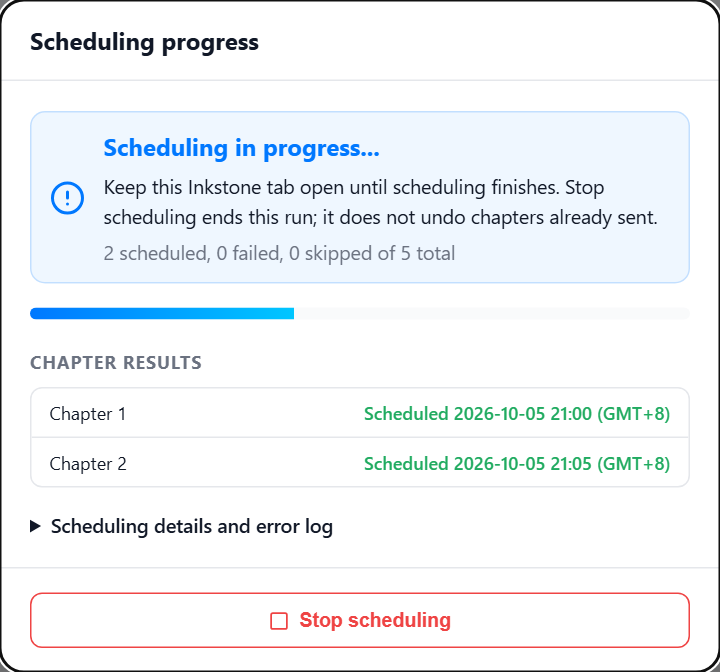
- Read the progress dialog for scheduled, failed and skipped counts. Chapter Results lists the outcome of each processed chapter.
- Wait for the run to finish before closing the tab. Pauses between chapter requests are expected.
- Expand Scheduling details and error log for details when a result needs attention.
- Use Stop scheduling if you need to stop. Wait for the current request to settle and read the final results before closing the tab.
- Confirm the scheduled chapters in Inkstone. Chapters already scheduled in Inkstone are not removed when you stop.
Recover from a failed, skipped or interrupted run
- Read Chapter Results and the expanded error log. A failed request, missing chapter and already-completed slot are different cases.
- Check Drafts and Scheduled chapters in Inkstone before retrying a timeout or interrupted request. The server may have received a request whose response was lost.
- Restore your Inkstone login, connection or missing chapter text as needed. Keep the same project and schedule while recovering that run.
- Use Retry failed chapters in the result dialog to retry failed or now-available skipped chapters. Confirmed successes for the same slot are retained.
- A fresh Start Scheduling can create a new audited run. Stopping or an error does not change what Inkstone already received; confirm the previous results before retrying.
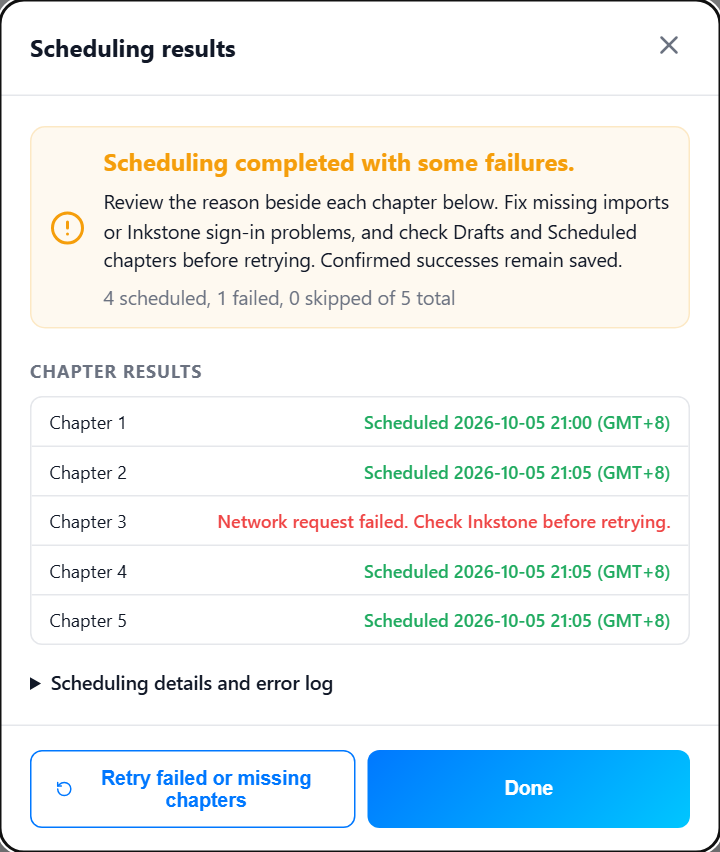
A skipped chapter that is still absent from the library cannot be retried successfully. Re-import it first. A run started with Premium may require Premium again for retry.
Back up, restore and manage multiple projects
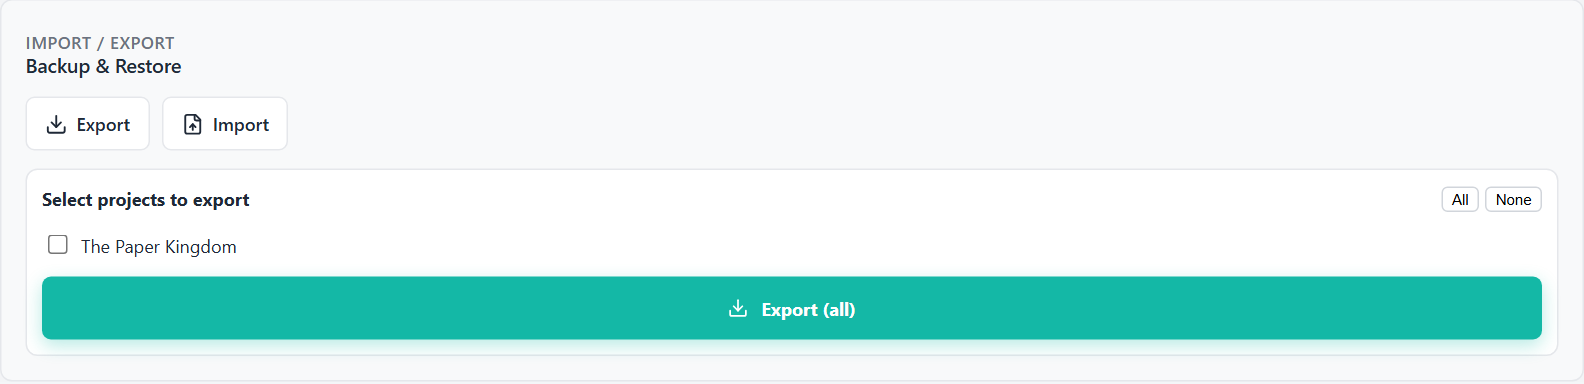
- Open Backup & Restore and choose Export.
- Choose individual projects, All or None, then click the export action. The download is a JSON settings backup.
- Keep your original .txt or .md chapter files separately. The settings export is not a backup of the complete imported chapter text.
- To restore, click Import and select the exported JSON file. Read any validation errors, select the restored project and check its settings.
- Re-import the original chapter files as needed, then save and review the schedule before publishing from the restored project.
Troubleshooting and final checks
- No floating scheduler button
- Enable Extension in settings, open an Inkstone chapter-list page, and refresh the page after installing or reloading the extension.
- No configured project
- Save a project with the same Book ID as the Inkstone page currently open.
- No chapters or missing numbers
- Import chapter text first. Check the library range and Missing field, then re-import the missing numbered chapter.
- Unexpected publish time
- Check Local Timezone versus GMT+8 Direct and the computer's detected timezone. The result screen reports GMT+8.
- Empty schedule preview
- Set a valid start date and chapter number. Enable at least one normal weekday, or configure a valid burst.
- Sign-in or account check expired
- Use Account and access to sign in or refresh. This does not replace the separate Inkstone login.
- Another run is active
- Finish or stop the run for that novel in the other tab before trying again.
- Uncertain scheduling result after a timeout
- Review Drafts and Scheduled in Inkstone. Do not blindly start a fresh run for the same chapters.
- Website and extension show different plans
- Check the account email on both, then refresh account status. They must use the same scheduler account.
For support, include the extension version, browser version, the affected chapter numbers and non-sensitive error text. Do not share chapter manuscripts, one-time codes or session tokens.
No matching steps. Try a different setting or chapter action.